Yesterday, we learned about creating characters. I hope you had a chance to create some of your own comic book characters using simple LINES, and SHAPES. Today, we will be discussing where ideas come from and how artists combine personal experiences with their imaginations when creating their artwork. | |
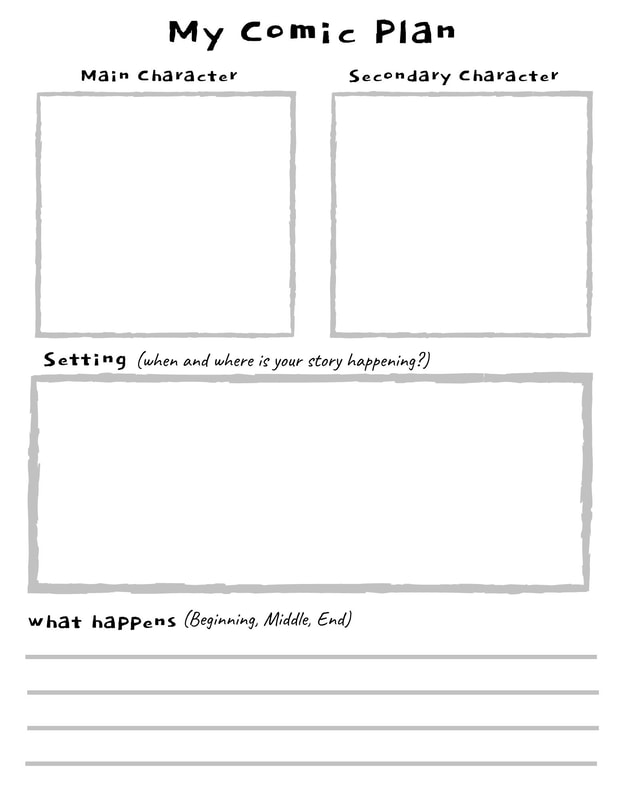
Your challenge today is to begin to develop your storyline in your comic. You can decide your character's strengths and weaknesses, the setting (time and place) of your story, and begin to develop your secondary characters as well. Let's plan your story.
0 Comments
Today, your challenge is to create your own comic book character. We will use this character in creating a story in part II of this lesson tomorrow. The best part about this lesson is that there are no rules. The only thing you need to be sure of is that you are RESPECTFUL when creating your character and story.
Every child should have a journal to record ideas, observations, thoughts, and feelings. Some children love to write, others cannot get enough time to just draw! This book will surely serve you and your kiddos well over the next few weeks. The best part about it is you can easily add more blank pages as it fills up! For this DIY Journal/Sketchbook you will need simple supplies you can find at home, or cheap from the dollar store (if they are still open :/) You will need
Now let's get to it! Step 1: PREPARE your book cover First you will want to open up your cereal box or grocery bag by cutting a fold line in the box/bag. You will be trimming the edges later, so this does not have to be perfect. Step 2: DESIGN your book cover You can use any materials you can find in your house to design your book cover. Paint, color, collage! They all work great! I chose to use some leftover white house paint I had in a closet to paint the patterns on my covers. After it dried, I used a black crayon from my daughters art box to embellish the simple design I painted. Step 3: CUT your cover to the size you want it CEREAL BOX: You will want to cut your cereal box so that you have to equal pieces (front and back cover). It is helpful if you cut the pieces so that a fold in the box, goes down the length of your cover about 1/2"-1" from the edge (see diagram below). This will help opening your book without having to make additional creases. PAPER BAG: Cut your paper bag in to a rectangle large enough to fit your paper inside when folded in half. Step 4: CUT your inside paper to fit your book size and PUNCH holes (x2 or x3) FIRST you should cut your inside paper to fit the size or your book. This does not have to be perfect :) SECOND Punch 3 holes in your book covers. The holes should match up when the covers are together. THIRD Use the holes in your cover as a template to punch matching holes in the rest of your pages. Step 5: GET some FRESH AIR! Take a walk outside to find a stick perfect for your binding. The stick should be fairly straight and about as thick as your pinky finger. Step 6: CUT your stick to length Cut or break your stick to a length just a bit shorter than your book binding. Step 7: BIND your book with ribbon or string You will want to have thicker string for this step. Yarn or ribbon works great. You will want to have about a full arms length (finger tip to finger tip) of string. You would rather have to trim some off later than not have enough...extra is good :) Starting from the front of the book. Feed both ends of your piece of string through the bottom hole (go through the front cover, inside pages and back cover). Pull the string through until there is a loop left. Put the bottom end of the stick through the loop and pull tight. Flip your book over and feed both ends of the string up through the second/middle hole. Pull all the way until tight. Turn your book back to the front side. Place the string pieces on both sides of the stick. Cris-cross them over the top of the stick and feed back through the same hole. Turn your book to the back side and feed both ends of the string into the top hole. Pull tight. Finally, tie a knot or bow around the stick at the top of your book and trim the extra string. Now you are ready to start drawing! I left the ribbon on mine long enough to use as a book mark! I mentioned at the beginning of this post that these journals are "re-fillable" . YES...THEY ARE! if you want to add more pages at any time, just cut or un-tie the ribbon binding, add your pages and re-string the book.
Did you know...?Now you can sleep in Vincent Van Gogh's bedroom! Well, sort of. As part of the Art Institute of Chicago's 2016 exhibit, "Van Gogh's Bedrooms," a replica has been created of the famous artist's bedroom featured in his paintings. For $10, members of the public can reserve a night's stay on the popular home-sharing website Airbnb. The bedroom of a one-bedroom apartment in River North has been transformed (down to the brushstroke) to look just like the bedroom in the Yellow House in Arles, France, that Van Gogh so adored in the late 19th century.
**I left a skinny tab of paper when cutting the triangle. This will be helpful later when glueing your room together! STEP 2: Design your Room Using a pencil, begin to draw your floor and walls. Make sure to include LOTS of details!!! Is your floor made of wood, tile, or carpet??? Maybe your floor is made of marshmallows! The more detail you add the better. In my example, I made sure to include a window, so I can see outside and a piano, because I LOVE music!!!. What are some things you NEED to have in your bedroom? After you draw all of your details in pencil, trace your pencil lines with sharpie and add some color. I chose to first add some TEXTURE with crayon. Next, I added some washable marker and brushed water over the top to create a watercolor paint effect. Take a look at my process below!
First, let's review. There are some important differences between SHAPES and FORMS.
Let's Get Started...STEP 1: Paint your Egg Carton Using what you have learned about color theory and color families, decide what colors you would like to use. Below are a reminder of some color schemes we have learned about so far. RELATED COLOR FAMILIES: These are colors that are like family, they are very close together and stand by each other's side. These FAMILIES consist of two of the three PRIMARY COLORS and the SECONDARY COLOR they mix to create. Needless to say, these colors mix very well and create beautiful colors when painting. COMPLIMENTARY COLORS These are colors that like a pair of good friends... although they are beautiful, bold and bright on their own, when they are together they are truly outstanding! These colors love to make each other look good....they "compliment" each other. Like some pairs of friends, they are COMPLETE OPPOSITES. This makes it easy to find them on the color wheel. The pair consists of a PRIMARY COLOR and the SECONDARY COLOR that is OPPOSITE or across from it on the color wheel. Although, these colors make each other look really great, they DO NOT mix well together when painting. They each like to shine beautifully on their own...like all best friends should. STEP 2: Prepare your Owl Body Cut your lid in half and draw your body. Notice that I have a rounded shape at the top for the head and that my wings and my feet go up into the sides of the lid. This will help your owl stand and be a 3-Dimensional FORM. After you finish sketching your body shape. Cut it out carefully. STEP 3: Create Your Eyes A pair of cups right next to each other can be cut and trimmed to create a pair of eyes. I included the point as well for my beak. Once your eyes are cut how you would like, you can paint a large white circle and smaller black circle to create the inside of your eye. Don't be afraid to add a splash of color too. If you don't have paint, cut out circles from paper, or draw your eyes in. Once you finish your eyes, glue them to your owl body.
Lynn AldrichLynn Aldrich's sculptures and wall artwork creatively use common, everyday objects like sponges, brushes and spoons! She is fascinated with color and loves texture! Check out some of her beautiful "under the sea" inspired creations! Let's Get Started...
Don't FORGET!!!
|
Each year on the third Friday in May, millions of pizza lovers across the nation enjoy the qualities of pizza on National Pizza Party Day. Since pizza is one of America’s favorite foods, it comes as no surprise we would celebrate a day that features a pizza party. Pizza parties bring friends and family together for birthday celebrations, teammates reward themselves after a game well played, and classmates acknowledge their hard work in achieving a lofty goal. |
Today we will be celebrating National Pizza Party Day with some 3-Dimensional Pizza Slices inspired by sculpture artist, Claes Oldenburg! Check out some of Oldenburg's Food Sculptures below!
Carefully glue and wrap your cardboard slice in your paper bag. See images below.
Crunch, crinkle and roll your bag to create the crust. Add a thin line of glue at the end and press down until it stays put
Using RED washable marker, color your sauce. Using a BROWN washable marker, color your crust. Brush water over the top to get a watercolor paint effect.
STEP 2: Create your Toppings
Divide a blank piece of paper up. You can include as few or as many toppings as you would like. You can even make this a goofy pizza, or a dessert pizza! With crayons, draw your toppings in each section, trace with marker, and brush water over top.
STEP 3: Build your perfect piece of PIZZA!
cut out each topping and start to glue and assemble your tasty slice of pizza!
Don't Forget to Share your |
Today we will be creating an optical illusion using simple SHAPES and LINES. The most important part of today's lesson is to USE A RULER or STRAIGHTEDGE when working. This will make your final design look crisp and very convincing. We will be reviewing VALUE, COLOR, SHAPE and FORM today and I will be introducing a new concept, IMPLIED FORMS!
First let's review...
SHAPE | FORM |
IMPLIED FORMS Today we will be drawing on a FLAT, 2-DIMENSIONAL piece of paper. We will be using LINES and COLOR and VALUE to make our cubs look NOT-FLAT and 3-DIMENSIONAL. These are called IMPLIED FORMS. In paintings or drawings that are flat, artists create FORMS that are IMPLIED because the artist creates an illusion of 3-DIMENSIONS when its really flat. |
Let's Get Started...
STEP 2: Create a Smaller HEXAGON
On a piece of paper or cardboard, make two dots. This will be the length of each side of your smaller hexagon. Line up these two dots with the diagonal lines you created in the previous step. Using your straightedge, connect the dots to create the sides of your hexagon. See images below.
STEP 3: Erase
In this step you are going to erase some lines we do not need any more. You will be erasing, 3 short diagonal lines in the smaller hexagon and 3 short diagonal lines in the outer hexagon. See images below. When you are finished, sharpie your pencil lines to make them stand out!
STEP 4: Color You can use anything you want to add some color to your cubes. In my first try, I chose to go with an ANALOGOUS or RELATED COLOR family. (RED-PURPLE-BLUE). Remember! ANALOGOUS colors are a set of three colors that are next to each other on the color wheel. Each family has two primary colors and the secondary color they create when they mix. (see below) |
In my second try, I decided to use a different VALUES. Remember, VALUE in art is how light or dark a color is. Lighter values are called TINTS and darker values are called SHADES. I chose to use marker but you can also shade with pencil, colored pencil, or crayon.
TINTS (lighter values) | VALUE SCALE | SHADES (darker values) |
Try out this 3 layered Isometric Cube (courtesy of Diana E. Marshall) |
Today we will be recycling some household materials to create beautiful, hanging, 3-Dimensional Fish. In this post I will show you step by step how I created my fish, however, you can substitute or add any steps or materials you have! We will be reviewing the Art Element of VALUE today and creating a variety of TINTS and SHADES of one color...a MONOCHROMATIC color scheme!
First, to kick off the project I have included links to some of my favorite children's books about fish! Check them out!
Rainbow Fish Now let's review... | Pout Pout Fish | The Bravest Fish |
As an art element, VALUE refers to the visible lightness or darkness of a color. Lighter values are called TINTS and darker values are called SHADES.
A GRAYSCALE is a value scale that uses only black and white to create different TINTS and SHADES of gray.
TINTS (lighter values) | GRAYSCALE | SHADES (Darker Values) |
A MONOCHROMATIC value scale is when you include many different TINTS and SHADES of ONE COLOR. See the monochromatic value scale pictured below.
TINTS (Lighter Values) | MONOCHROMATIC VALUE SCALE | SHADES (Darker Values) |
Let's Get Started!
STEP 1: Paint your Egg Carton
We chose to go with a MONOCHROMATIC Red/Orange-ish Color Scheme. We used a little bit of yellow with some red and white paint to get a variety of TINTS and SHADES of this Red/Orange Color.
STEP 2: Design Some Paper
Using some of the paper design techniques you know, create a piece of paper that can be used for the head, tail and fins of your fish. The trick to this step is that you have to remember that our fish will be hanging and 3-Dimensional. When you create your paper, make sure that it is large enough to have two heads, two tails and four fins.
I created my paper by drawing a pattern with crayons that fit with my RED/ORANGE color scheme. I then traced that pattern with washable marker and brushed water over the top to create a watercolor effect.
STEP 3: Draw your Fish Parts
Fold your paper in half so that the decorated sides are facing out. With your paper still folded, draw the shape of your head, tail and two fins. You can definitely add more fins and details if you would like. Create some texture for scales and bones. Don't forget to add the eye and lips!
STEP 4: Cut Everything Out
With your paper still folded, cut out your head, tail, and fins. This will give you 2 head shapes, 2 tail shapes and 4 fin shapes. Add your details to the other pieces.
By this time your egg carton should be dry. Cut out each individual cup and shape them however you want. You may want to make your edges even. We chose to make our edges bumpy like wavy fish scales.
Hang in a beautiful spot to enjoy! DON'T FORGET to SHARE your CREATIONS with Mrs. Castellano! |
ARCHITECTURE Yesterday we learned a little bit about ARCHITECTS and what they do. You had the opportunity to begin to design your perfect tree house! You had to consider a lot of different details when designing your treehouse. For instance, you needed to determine how you will get up and down? As well as what your treehouse is made from. ARCHITECTS need to pay special attention to all of these details when designing what their buildings will look like from the OUTSIDE. They ALSO need to be mindful of what their INSIDE SPACES will look like as well. Today, I am challenging you to design some inside spaces for your treehouse. These INSIDE SPACES will be underground! On a second sheet of paper attach begin to draw what your underground fortress will look like. What rooms will you have? How big will they need to be? What do you plan to do in these rooms? |
| When Harley and I were planning our underground rooms we decided we absolutely HAD to have an Art Room. We also thought it was important to have a kitchen and dining room for our family. She REALLY loves her trampoline so we made one entire room into a trampoline rooms. Finally, we love to have fires together as a family so we thought it was a good idea to have one room be a bonfire room! |
Don't Forget to SHARE your artwork with Mrs. Castellano!
What's happening in the ART ROOM?!
Check out the exciting things happening every day at Stanley-Boyd Elementary, where we celebrate the unique qualities and ideas that every student brings to our table!
Archives
February 2021
December 2020
November 2020
June 2020
May 2020
April 2020
March 2020